

Thursday, February 25, 2010
Altered DVD Tin
Check out this week's challenge on the Cropstop message board! Bianca has provided us with a step by step tutorial on altering a DVD tin. Stop by the message board and see how she did it. Then, show us what you can do!! Find it HERE!
Friday, February 19, 2010
Friday Embossing Project - Cuttlebug Border Frills
The Embossing project today is combined with the weekly challenge that was posted yesterday. I made a skinny notepad holder. Visit the message boad to see all the details.
 Have a great week!
- Gloria
Thursday, February 18, 2010
Alter this!
Today's challenge puts us in an "altered state"! We challenge you to alter a notepad or coupon holder to your taste! If these don't suit you, show us an altered item that you have created!


Wednesday, February 17, 2010
Twice as Nice
It's Twice as Nice when you double emboss!
See how it is done on Peggy's YouTube tutorial, you'll never use a single embossing folder again!
http://tiny.cc/DoubleEmbossing
See how it is done on Peggy's YouTube tutorial, you'll never use a single embossing folder again!
http://tiny.cc/DoubleEmbossing

Card by Sue Nelson
Friday, February 12, 2010
Friday Embossing - Cuttlebug Asian Set - Kimiko
I've been having fun playing with the Cuttlebug Asian themed embossing folders. Today I used the Kimiko folder.
 Check the Message Board for details!
- Gloria
Thursday, February 11, 2010
Challenge #6 - Stamp it Out! + Throw me a punch
Ladies this week is an easy one (I think... LOL!!!!). You will use one technique from those in the new "Stamp On it!" area in our board + AT LEAST 2 punches.
 You have till next Wednesday to submit your project for this challenge. READ ALL about the new rules HERE.
You have till next Wednesday to submit your project for this challenge. READ ALL about the new rules HERE.
Tuesday, February 9, 2010
A window card

Sunday, February 7, 2010
Yummy Papers!!!
We have these great 6 x 6 paper pad kits and stacks in the Cropstop store! They are perfect for making cards. There are quite a variety of them to select from too! 7 Gypsies, Basic Grey, Cosmo Cricket, Doodlebug, Kaisercraft, and Making Memories.
These yummy papers are from the Kaisercraft Lilac Avenue Collection. Beautiful papers with embossing and glitter! The colors are so fun and "Springy"! And, we all need Spring right about now. So stop on in the Cropstop store and take a look around!
Don't forget to grab the discount code from the sidebar!
I used the SU Top Note Die, some sheer lavendar ribbon and a tag from the paper stack. There are lots of different ones to choose from. The rub on sentiment is from my stash and is from an old Making Memories collection.
 Here's a close up look at the embossing and glitter!

Here I used the Spellbinder Fleur de Lis die along with a Spellbinder Scalloped Square for the center of the card. The two color/two layer Fleur de Lis die cuts are stacked using pop dots. The flower and sentiment stamps are SU. The border punch is Martha Stewart Hydrangea. I added some American Craft dotted swiss grosgrain ribbon just under the sentiment.

These yummy papers are from the Kaisercraft Lilac Avenue Collection. Beautiful papers with embossing and glitter! The colors are so fun and "Springy"! And, we all need Spring right about now. So stop on in the Cropstop store and take a look around!
Don't forget to grab the discount code from the sidebar!
I used the SU Top Note Die, some sheer lavendar ribbon and a tag from the paper stack. There are lots of different ones to choose from. The rub on sentiment is from my stash and is from an old Making Memories collection.
 Here's a close up look at the embossing and glitter!
Here I used the Spellbinder Fleur de Lis die along with a Spellbinder Scalloped Square for the center of the card. The two color/two layer Fleur de Lis die cuts are stacked using pop dots. The flower and sentiment stamps are SU. The border punch is Martha Stewart Hydrangea. I added some American Craft dotted swiss grosgrain ribbon just under the sentiment.

Saturday, February 6, 2010
More uses for your border punches
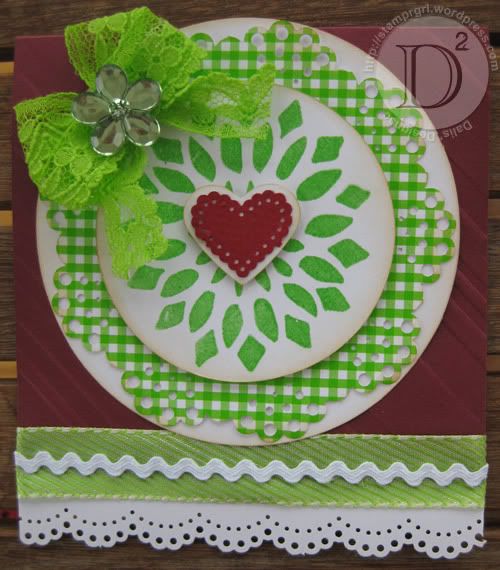
 I thought that since we all have them why not use them to their full capacity, right? Here in this close up you can see how we used the corner punch "LOOP EDGE" by Martha Stewart to punch around a circle to create a doily or medallion. In the completed card you see that we also used the corner punch as intended too but only in the corners to bring a little detail and more cohesiveness to the card.
 On this next image you can see different samples of medallion/doilies and some of little sentiment or journaling tags.
I put out some simple steps to achieve the medallions or doilies look.
TUTORIAL
- Cut out your 4 inch circle
- Turn your punch over (so you are looking at the back of your punch. I find it easier to do all the steps w/ the little wings of the punch closed up.
- For the Martha Stewart punch you will see they kind of look like a diamond shape. Line up the bottom corner w/ the border of the circle and punch.
- To align the next one, just align again w/ the border of the circle but also align it so the left corner of the diamond is touching the right corner of the first punch you did in the circle (this is true for right hand people, for left hand people align the right corner of your punch w/ your left hand punch image on the circle).
- Keep punching around and around... until you are done.
Friday, February 5, 2010
Friday Embossing - Pop Culture Border Folders
It's Friday and that means it's time for the CropStop Embossing project.
I have used the circles border folder from the Cuttlebug Pop Culture border set for today's card. I embossed the border, then rubbed it with a bit of chalk ink. This gives just an accent to my card.
I have used the circles border folder from the Cuttlebug Pop Culture border set for today's card. I embossed the border, then rubbed it with a bit of chalk ink. This gives just an accent to my card.
 I used Koh-I-Noor colored pencils, plus odorless mineral spirits and blending stumps to color my image. (This image is a digi image from The Stamping Boutique).
CropStop has a new section on the Message Board called Studio Playground. There is a forum there for learning to use Copics. But, I have found that many of the techniques used with Copics are also helpful for using other markers and pencils. I hope you check out the new playground!
Flower Power Challenge
Do you want a challenge? Do you like flowers?
Well come on then and join my weekly challenge and make some 3D flowers HERE.
Here are some ideas on what you can do.


Well come on then and join my weekly challenge and make some 3D flowers HERE.
Here are some ideas on what you can do.
Tuesday, February 2, 2010
A male card?
I bought myself an owlstamp and wanted to use it right away so I made a card this week.
Im sorry to say, but my camera and I aren't working together right now, so the photos are quite bad!


I made it quite simple so it's suitable for a man/boy since I don't have so much cards for males and I need to stock up with them. I have used a stamp and colored it with Copics, then embossed it so I could make the background with distress inks.
The frame is a Slice cut that I have embossed with a CB emboss folder, the ornament is a Cuttlebug die that I borrowed from my mom a long time ago and I'm so sorry I can't remember it's name.! The leaves on the other hand is a Quickutz die, an old one, but ohh so useful! To finish I adhered a ric rac ribbon and some pearls in the ornament.
Copics used: E00, E02, E29, E37 and G94
Subscribe to:
Posts (Atom)