Showing posts with label embossing. Show all posts

Monday, September 24, 2018

Tone on Tone


Hello craft friends. Today I'm sharing a clean-and-simple card featuring one of my favorite leaf stamps. I wanted to show you a fun little trick for creating tone-on-tone color....You simple color in your image with a Versamarker Pen and wa-la you have a lovely monochromatic effect!


Supplies and Tools:


Now it's your turn....stop by our CURRENT LINK PARTY and showoff any project that includes a product or two from one of the companies Cropstop carries in the store!

Monday, May 14, 2018

Clear Gesso


Hello friends! I'm fairly new to the mixed media art world, so I'm having a lot of fun experimenting with different products and discovering techniques to use in my card making. Today I want to share a card I created with Clear Gesso as the base, so let's get started.....


To create my background I:
  • painted a piece of card stock with a layer of Clear Gesso (Art Basics)
  • once dry, I used sponge daubers to apply Broken China Distress Oxide (Ranger) to the center
  • next I, spritzed the ink with some water
  • using a small paintbrush, I spread the ink around my card stock to form a pretty background and let it dry
The wonderful thing about Clear Gesso is that it doesn't change the color of your paper at all, but it gives you a surface that's slightly textured and holds the paints, inks, watercolors you apply so they won't soak into your paper right away. Regular card stock will soak up the color, dry quickly, and pill after too many applications of water. Here's a photo of white card stock without the gesso to show you the difference in the above technique:


You'll notice:
  1. The color didn't spread nearly as far - the center is dark/the edges are light - uneven color
  2. The color isn't as vibrant as it soaked into the paper
  3. The paper has a bit of "pill" to it
  4. It doesn't look like watercolor like the above panel does

To create my panel I:
  • stamped flowers, stems, and "sentiment" from the Blossom stamp set (Tim Holtz) in Tuxedo Black ink Tsukineko)
  • colored the stems with Touch Five Markers
  • using a Splatter Brush (Ranger) I applied some diluted (with water) Frayed Burlap Distress Oxide (Ranger)
  • glued my flowers (below) over top and fussy cut around one to create a popped out image
 

For the flowers I:
  • painted a piece of card stock with a layer of Clear Gesso (Art Basics)
  • stamped a flower from Blossom (Tim Holtz) in Versamark Watermark ink and added black embossing powder
  • applied some Spun Sugar Distress Crayon (Tim Holtz) to the petals and painted with water and a small paintbrush (since I was cutting these out I didn't worry about staying in the lines)
  • applied Picked Raspberry Distress Crayon (Tim Holtz) to the petals and repeated the wet paintbrush step
  • applied Spiced Marmalade Distress Crayon (Tim Holtz) to the centers and painted it with water
  • using just water and a clean paintbrush I removed some of the ink from the centers of my flowers
    • This is possible because of the Clear Gesso -- the ink is longer drying and can be moved around and removed for some time - I tried this same technique on regular white card stock without gesso and it didn't work!

To finished off my card I:

Now it's your turn....stop by our CURRENT LINK PARTY and showoff any projects that include a few products from companies Cropstop carries in the store! I'll look forward to seeing your work appear in the gallery!


Monday, April 30, 2018

Stamping Collage Cards #2


Today I'm sharing the last two cards I created around the ticket embellishments I shared in this post.
This is such a fun style to create with all the stamping and layering. There's really not a right and wrong way to do it, I just picked stamps/embellishments in a general theme and color scheme.


Here are the layers I used on this first card:


For the layers on the last card are:

Have you ever created collage style cards? If so I'd love to see them! Stop by the CURRENT LINK PARTY and showoff  any project that include a few products from the companies Cropstop carries in the store!

Thursday, February 10, 2011

Challenge #6: Pure and Simple

This week's challenge is to use only white (or off-white).  I understand that if you are going to be stamping you might need something more for us to see the images, so we are going to allow you either brown OR black Values for stamping and/or coloring, but the majority of the card should be white to qualify for the challenge this week.

You will need to complete and link your project using the Linky Tool at the bottom of this post by February 16th at 11:59 pm EST in the U.S. CropStop will randomly choose one prize winner and the Creative Team will choose their favorite projects to receive our "Cream of the Crop" badge to display in your blog and signature!

Now let's enjoy the samples from the CropStop's Creative Team, and remember starting next week you will get to enjoy the wonderful projects from our new Creative Team Members.


Remember: Every Thursday at 8:00 AM (EST) we will post a new challenge. You will have one week to link up your project and be counted for the prize draw and Cream of the Crop blinkie! For all the rules, see the link in the sidebar. (If, for some reason, Linky Tools is not working, place your project link in the Comment section.)

Saturday, December 19, 2009

Embossing Folder's Review

Embossing Folder Review
By Gloria Stengel

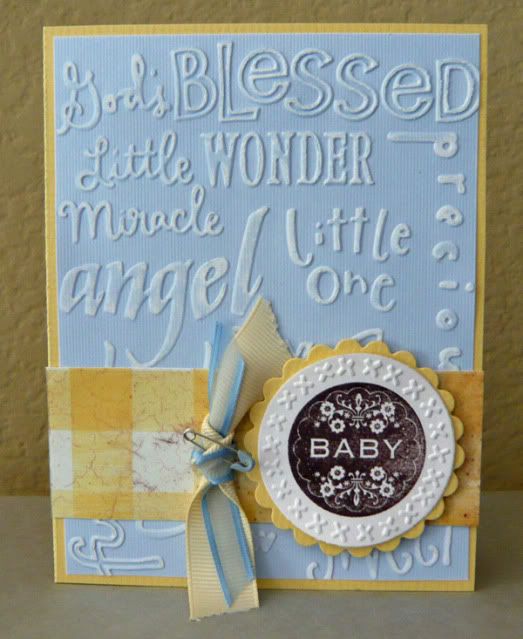
With the introduction of personal die cutting systems and embossing folders, dry embossing has been making a big comeback in the stamping and scrapbooking arenas. Most of the die cutting system companies now make embossing folders or texture plates, which are very easy to use and come in a variety of styles. Some are folders that contain a brass template and a counter die; some styles are plastic folders with a positive and negative image (commonly called A2 folders), and some are plastic texture plates. However, they are all very simple to use. Each of these embossing mediums creates an embossed image, but the A2 size embossing folders are my favorite, as they give a fantastic embossed impression on any style of paper or cardstock.

I had the opportunity to play with Cuttlebug, Sizzix, and Quickutz embossing folders, and Sizzix texture plates. I found that the Cuttlebug Embossing Folders and new Sizzix Textured Impressions Folders are very similar and give a very deep impression. The new Quickutz Embossing Folders give what I call a light impression, similar to that of the Sizzix Texturz Texture Plates. However, I was able, by adding a sheet of cardstock (a shim) under my system cutting plate, to “encourage” the Quickutz Embossing Folders into giving a deeper impression. I also add a shim when embossing with the Sizzix Texturz Texture Plates to give a deeper impression, but I’ve never been able to get an impression close to the quality of the A2 size folders.

Cuttlebug makes a selection of border folders (in sets of 5), and small embossing folders sets of four small (2x2.75) folders, in addition to the A2 embossing folders. Cuttlebug also makes sets of “cut and emboss” dies and folders. With these sets, you can cut a shape AND emboss it in two easy steps. Sizzix Textured Impressions Folders come in sets of two A2 size folders or in sets containing one A2 folder and three or four smaller folders in one theme. Quickutz embossing folders come either in sets of four 2x2 folders, border folders, or single A2 size folders. All prices are comparable.
Here are a few ways to enhance your embossed images:

1. Use white core cardstock or paper to get a unique, distressed look to your embossed images. Once the image is embossed, rub the raised image lightly with sandpaper to remove the color from the paper. If the paper has a white or alternative color core, this will be revealed after sanding.

2. You can enhance your embossed images with chalk or stamping ink. For detailed images dip a cotton swab or foam sponge into the ink or paint, and then swipe over the image. I get the best results with Colorbox Chalk Ink or Quick Quotes Powder Puff ink.

3. An easy way to add ink to your embossed images is to open your embossing folder so that the negative side is facing down on your table. Apply ink to the negative side using either a sponge, brayer, or the ink pad itself. Place your cardstock over the inked side, close the folder and roll it through your die cutting machine as before. (Make sure to wash your folder right away, to avoid any staining from the ink.) Remember, if you are using chalk inks or pigment inks, you will want to wait for your paper to dry before completing your project.

Please stop by the CropStop Embossed Impressions folder for more information and project ideas using embossing folders, texture plates, and brass stencils.

Saturday, October 17, 2009

Cuttlebug Pumpkin Card

Gloria has created another gorgeous card for our Embossing Folder's section in our community... come check out what she did and her story behind the card.

Thursday, May 28, 2009

Using Sandpaper and Embossing Folders

I love the look of embossing, but I REALLY love to sand the color off the image to reveal the white paper core (or in some cases the colored core). 

Image

Simply emboss your image, and then GENTLY sand over the top of the raised embossing.

Image

by Gloria - Check out more on CropStop's Message Board specifically at the Chatter about Cuttlebug area!

Thursday, March 26, 2009

Art Pieces Challenge Blog


We are sponsoring Art Pieces ATC challenge blog this week. The challenge starts Tuesday 24th and lasts until 31st of March, and the challenge this time is:
Make an ATC using Swirls and glitter (and embossing if you want).


In Norwegian:
Premien denne uken hos Art Pieces ATC utfordringsblogg er sponset av Crop Stop.Utfordringen varer fra 24. til 31. mars, og utfordringen denne gangen er:
Lag en ATC der du bruker Swirls og glitter (og embossing hvis du vil).

http://artpieceschallenges.blogspot.com

Thursday, January 15, 2009

CropStop's Class Schedule

The school is in session ladies!  Go check out what you have been missing.
  • Jan.5th - Magnetic calendar


  • Jan.12th - Adding texture to your pages
  • Jan. 19th - Stuck on stickles
  • Jan. 26th - Mini class, Post It Notes/Q&A Session

  • Feb. 2nd - Stamping with baby wipes
  • Feb. 9th - Stamping/embossing on flowers
  • Feb. 16th - Date Reminder Flip Book
  • Feb. 23rd - Mini Class, Restaurant Survival Kit/Q&A Session