Showing posts with label heartfelt creations. Show all posts

Monday, January 14, 2019

He Heals the Broken


Hello Friends, today's card features one of my favorite stamps to use on sympathy cards. I did it up in neutral tones, adding just a touch of light blue and lavender to match the ombre ribbon from Cropstop.

Supplies and tools:
Circle Nestabilities (Spellbinders)
Blossom Nestabilities (Spellbinders)
Distress Ink in these colors: Salty Ocean/ Shaded Lilac/Hickory Smoke


I'd love to see what you've been creating, so stop by the  last link party and showoff any creation that includes a product or two from one of the companies carried in the Cropstop store. 

Monday, November 12, 2018

Bauble Blossoms


Hello friends! It's time for another "Inspiration Monday" post. Today I'm sharing a bright and happy card I created using some new Cropstop supplies I recently acquired!


Here's how I put this card together:


Now it's your turn....stop by the current link party and showoff any creation that includes a product or two from one of the companies carried in the Cropstop store.

Monday, November 5, 2018

November Link Party - # 45


Hello crafty friends! It's time for another link party here on the Cropstop blog. Today I'm sharing an autumn window card I created with a floral embellishment. For a mini tutorial on creating the sunflower visit this post from several weeks ago. (This card uses one each of the two smallest sizes.)


To create the background I scored a piece of kraft cardstock every 3/4 of an inch and swiped my walnut stain distress oxide across it. I die cut and distressed the window using the same ink. I also sponged all of the leaves with coordinating colors to add more depth and interest to them.


Supplies and Tools:


 Now it’s your turn to share the projects you’ve been working on! As always our link party is "Anything Goes" with these few simple rules
  1. Create ANY new project using a product or two from one of the companies CropStop carries in the store. (It’s ok if you didn’t buy it from us, and also fine if it’s a product we don’t currently have it in stock as long as it’s from one of the companies we carry!)
  2. Please, no back-linking old projects
  3. Limit 5 entries per challenge
  4. Link your project here, link back to this post, and mention the CropStop Challenge in your post.
We’ll choose one random Winner who will receive a prize from the CropStop Store! (100 or more links = two winners and two prizes!) Thanks so much for linking up with us, we look forward to seeing all your great entries this month. Grab our badge and help us spread the word that CropStop is a great place to play along!

Optional Twist for November:
Create a project that includes fall leaves and I'll enter your name twice in the random draw.

Monday, October 29, 2018

Blanket Plaid


Hello Friends. Today I'm sharing one last "Ocotober Plaid" post. I call today's pattern, "blanket plaid" because it reminds me of a warm and cozy throw you might snuggle up under on a cold winter evening.


Here's how I created this design:
  • Traced a double wide line of brown down a piece of kraft card stock
  • Traced three thin lines of teal and then repeated step one
  • Turned my cardstock 90 degrees 
  • Traced a double wide line of teal
  • Traced three thin lines of brown

I couldn't decide which style to use with this plaid -- rustic, classy, vintage???? I finally decided to do a "dressed up" plaid  with some pretty Petaloo flowers and scalloped edging.

Supplies used on this card:


There's still one week left to enter the October Challenge so be sure to stop by our Current Challenge and link up any project that includes a product or two from one of the companies Cropstop carries in the store. Remember if you link up something that includes a plaid element your name will be entered twice in the random drawing for a prize!

Monday, October 1, 2018

October Link Party - # 44


What do plaids make you think of? For me, they evoke feelings of cool autumn nights, curled up with a good book, a warm (plaid) blanket, and a cup of something steamy in hand. That's why the entire month of October I plan to share easy, do-it-yourself, plaid backgrounds you can create using markers. There are also a couple fun ways to use your plaids, so you won't want to miss any of the Monday inspirational posts this month!


Supplies need to create your own plaid background:
  • Markers
  • Ruler
  • Graph Paper (optional)
    • I found that placing a piece of graph paper under my card front made it much easier to line up the ruler and create straight lines

Directions for my background:

  1. Beginning with an orange marker - create wide stripes both vertically and horizontally
  2. Next use a yellow marker and add wide stripes in between your orange ones
  3. Add some thin brown stripes
  4. Add some thin green stripes
  5. Using a darker yellow marker -- trace over every other yellow stripe to darken it and add interest to your background
  6. Using sponge daubers, ink around the edges with dark brown ink
  7.  


Supplies used on this card:
Note: For a mini tutorial for the flower on this card, visit the Tutorials Tab at the top of the blog and click on 3D Sunflower.


Now it’s your turn to share the projects you’ve been working on! As always our link party is "Anything Goes" with these few simple rules

  1. Create ANY new project using a product or two from one of the companies CropStop carries in the store. (It’s ok if you didn’t buy it from us, and also fine if it’s a product we don’t currently have it in stock as long as it’s from one of the companies we carry!)
  2. Please, no back-linking old projects
  3. Limit 5 entries per challenge
  4. Link your project here, link back to this post, and mention the CropStop Challenge in your post.
We’ll choose one random Winner who will receive a prize from the CropStop Store! (100 or more links = two winners and two prizes!) Thanks so much for linking up with us, we look forward to seeing all your great entries this month. Grab our badge and help us spread the word that CropStop is a great place to play along!


Optional Twist for October
Include a plaid element somewhere in your creation,
 and I'll enter your name twice in the random draw.

Monday, September 10, 2018

3D Sunflower


Fall weather hasn't arrived yet (where I live), but maybe this autumn themed card I created with a beautiful 3D sunflower on it will get things moving in that direction! (smile!) I used one of the old Heartfelt Creations stamps sets to create it, and I have a mini tutorial to show you how it's done.


Step One: Stamp and cut out three different sizes of flowers (the photo shows only one large one -- I actually used two)
Step Two: Ink your flowers with coordinating ink making the centers darkest
Step Three: Cut between each petal of your flowers
Step Four: Spritz the reverse side of your flowers with water


Step Five: Crumple each flower into a tiny ball
Step Six: Unflold and twist and crumple your petals
Step Seven: Heat Set
Step Eight: For sunflowers - add some glue and instant coffee to the center


Note: If you don't want the coffee to dissolve in your glue use perk coffee instead of instant. (You can check out the other look by visiting this post.)

Supplies and Tools used on this card:


Have you been working on fall cards? If so I'd love to see your work! Stop by the current link party and showoff any project that includes a product or two from one of the companies Cropstop carries in the store.

Monday, August 27, 2018

Retiform Stamping


Hello friends! Today I'm sharing a card made with an old technique that I just recently learned about from my friend Shirley (Glittered Paws). The technique is called Retiform Stamping, and I'm showcasing it today as well as showing you how I made this card.


To create my background I:
  • marked off a section of my card front with a piece of cardstock and inked along it's edge
  • moved the cardstock and inked again
  • kept moving/inking till I created the "boxes" you see above
  • lightly inked the inside of the geometric lines

Next I:
  • isolated each box with post it notes and stamped different designs in distress oxide ink
  • added a piece of burlap ribbon across the bottom
  • added a Heartfelt Creations sentiment to the bottom corner
  • matted my piece on brown card stock and adhered it to my kraft card 


Here are the supplies I used on this card:


I'd love to see any creations you might come up with using this old technique, so stop by the current link party and showoff any project that includes a product or two from companies carried in the Cropstop store. 

Monday, August 20, 2018

Distress Spray Stain


Today's card features Antique Linen Distress Spray Stain on nearly all the elements. You can see by the different shades on this card that I started with several different paper colors (white, cream, manila) and applied more or less to achieve different tones.The background (manila) has a heavier layer and looks vintage and stained while the the tag is lightly spritzed white paper and looks totally different! Click here to check out the Distress Stains Cropstop currently has in stock!


 To create the background I:
The front panel is another take on Coloring Gesso with Distress Crayons (picture tutorial here)
  • I added White Gesso through the  Floral Stencil (Tim Holtz) using the Dina Wakley Pallet Knife
  • Then I removed the stencil and washed it
  • I heat set my panel and then laid the stencil back over it adding Distress Crayons (Spun Sugar/Festive Berries/Twisted Citron/Pine Needles)
  • I removed the stencil and spritzed over the panel with Antique Linen Distress Spray Stain
  • I cut it into 3/4 inch strips and distressed the edges before adhering them to a piece of cardstock and adding a lace border punched with the Eyelet Lace border punch (Martha Stewart)


To finish of the card I:

  • Die cut flowers using the Tattered Florals (Tim Holtz)
    • Added Spun Sugar/Festive Berries Distress Crayon to the flowers, and rubbed it in with a slightly damp finger
    •  lightly prayed the flowers with  Antique Linen Distress Spray Stain and crumpled them to give them a more distressed look
  • created a 3D rose using the 3D flower die from Sizzix, spritzed it heavily with Antique Linen Distress Spray Stain and added a large pearl to the center before gluing it to the center of my large daisy
  • die cut a swirl from the Romantic Vines die set (Spellbinders), and some foliage from Tim Holtz's Fall Foliage die set


 I would love to see the ways you use Distress Stains so stop by the current link party and showoff any creation that includes a product or two from one of the companies Cropstop carries in the store.

Friday, May 18, 2018

Guest Designer - Kathy Krug


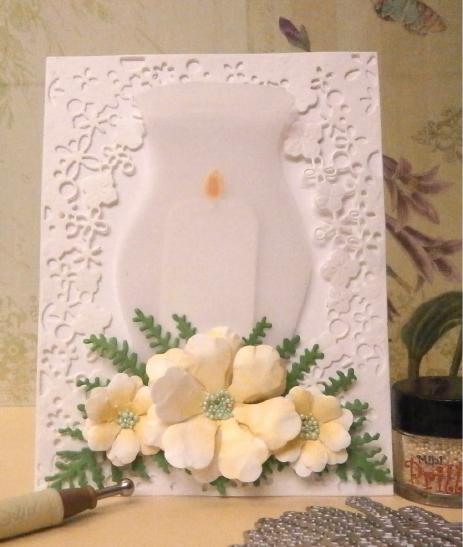
It's Guest Designer Friday and today we're sharing the talent of Kathy Krug of Stamp With Ink. Kathy created a beautiful spring card with a delicate border and gorgeous floral arrangement underneath her hurricane candle. I absolutely LOVE the gorgeous flowers she created with their pretty prill centers!
 
Here's what Kathy says about putting this card together:
"The front of the package for this Elizabeth Craft Hurricane candle pairs it with some pine boughs and a poinsettia so I think the idea was for a Christmas card. It is too pretty to use just for Christmas so I created a spring time card that could be used for many different occasions. 
Here are the directions:

  1. Cut a card base 4 ¼ by 5 ½.
  2. Cut another piece of card stock a little larger and cut it with the Memory Box Blooming Floral Frame.
  3. Adhere to the card base.
  4. Cut the hurricane two times from vellum
  5. Cut the candle three times from card stock and glue together to give it some dimension.
  6. Glue candle to one piece of the vellum
  7. Glue the second vellum hurricane on top using Ailene’s tacky glue at the bottom part of the hurricane where the flowers will cover the glue.
  8. Cut and shape Heartfelt Creations Arianna Blossom and put some Prills in the center.
  9. Tuck some Elizabeth Craft ferns behind the flowers."


Thanks for sharing your talent with us, Kathy!
Now it's your turn....stop by our CURRENT LINK PARTY and showoff any projects that include a few products from companies Cropstop carries in the store! I hope to see YOU there!

Friday, April 27, 2018

Guest Designer - Vicki Robertson


Time for another Guest Design post here on the Cropstop blog. Today I'm sharing the talents of Vicki Robertson of He"artful" Validation of Vicki. Vicki has not only created a beautiful spring themed card to share with us, but also includes step by step directions (with photos!) for our readers.

Vicki Says: "This card base is  6" x 6", which happens to be my "go to" size when creating cards.  There's something about four symmetrical sides that makes me feel like I'm working on mini canvas or layout.

The "How-to"..
1.  Cut your card base 6" x 12", fold in half and crease.

2.  Cut the next layer of cardstock 5 7/8" x 5 7/8" and adhere to base.

3.  Cut patterned paper 5 3/4" x 5 3/4" and adhere to previous layer.
4.  Die cut two Foliage Flourishes and adhered to top and bottom of card front.  

5.  Die cut Majestic Oval and adhere Nesting Oval die cut centering it in the opening.  Place white foam tape to back for dimension and adhere to card center.

6.  Make bow and hot glue at top of oval.


7.  Die cut, ink and assemble flowers using foamiran.
 8.  Use black micro beads mixed with glue to create flower centers and let dry.  Hot glue flowers over the bow.
9.  Add sentiment using Elizabeth Crafts Banner die.

10. Glue butterfly to center of oval. 

Thanks, CropStop, for having me as a Guest Designer once again! It's always a pleasure to be here."
 Supplies and Tools:

Aleene’s Tacky Glue
Bazzill Paper
  Core'dinations Cardstock
Elizabeth Crafts Banner Die
Foamiran for Flowers
Heartfelt Creations Vintage Floret
Love Nicole Patterned Paper
Martha Stewart Micro Beads  
Prima Butterfly
Really Reasonable Ribbon
Spellbinders Shapeabilities Foliage Flourish
Tutti Designs Dotted Nesting Ovals

 Thanks for sharing your talent with us, Vicki! 
Now it's your turn....stop by our CURRENT LINK PARTY and showoff any projects that include a few products from companies Cropstop carries in the store! 
I'll look forward to seeing your work appear in the gallery!


Monday, March 26, 2018

Crayon Resist


Welcome back to the Cropstop blog! After experiencing quite a few problems on our other blog platform (culminating in being locked out completely!) we've decided to move back to Blogspot and resume were we left off.
Monday we will resume our monthly link party and this Friday we will resume our guest designer posts! 


Today I'm sharing a spring themed card with you. Here's how I put my bright and cheery card together:
  • I started by embossing a piece of white card stock with the Christmas Quilt Embossing Folder (Couture Creations)
  • While the card stock was still in the folder, I rubbed over the raised part with a pink crayon (Note: keeping the card stock in the embossing folder provides stability and keeps the design from being crushed)
  • After it was covered to my liking, I removed it from the folder and covered it in Wilted Violet Distress Stain (Tim Holtz) and heat set it with my embossing gun


Be sure to come back Monday and link up your projects that use products from the companies Cropstop carries in their store for a chance to win a great prize! Hope to see you there!!